Time for my first ever Weekend Project: How to Organize Teacher Computer Files in 5 Easy Steps
Maybe you’ve never given a single thought to where you save your computer files. Perhaps you started the year off organized but by the end of the year had given up and have a massive cluster of files shoved in My Documents. With any luck you at least know what My Documents is : )
Regardless of your computer experience or how diligent you are, we all end up with a mess of digital files on our teacher computer at some point. If it’s gone on for a while, you may have hundreds, nay thousands, of files to sort through. It can be overwhelming, but rest assured, I’m here with the answer, because it’s time to finally organize your teacher computer files, and I’m going to show you how to do it.
Project Completion Time: 1 – 12 hours (depending on how organized you were to begin with and how computer savvy you are)
First things first, make sure you have enough time to get this all done before you need to use your teacher computer again. The process involves taking EVERYTHING off of your computer, and the last thing you need is to go crazy trying to find a file you need, or to undo the process out of necessity to get back to work. This can be done on a weekend, but I like to do it during the summer; mainly because IT tells us to back up our computer before we leave anyway, and it ensures that I'll have plenty of time to get it done..
Step 1: Take all of the files off of your teacher computer
The first thing you need to do is get your files off of your teacher computer. Yes, you could potentially do all of your sorting from within your teaching computer, but I guarantee you’ll be far more likely to stop in the middle of it (and either abandon it or forget where you were and have to start over), or will be far more reluctant to get rid of files you don’t need. You want a clean start here, so the best thing to do is to get your files to neutral territory so that you can look at it through a critical lens.
So, go through your work computer and move all of your files to a portable USB drive (aka flash drive aka pen drive). Don’t have one? I love the Lexar TwistTurn drives, since they swing closed to protect the USB end when you’re not using it.
Because there is such a wide variety of computers in use in schools, I am not providing detailed instructions for this step. The basic process is to drag all of your computer files into a single folder on your USB drive. I name my folder Work Computer and then the date I moved all of the files.
Make sure to check My Documents, Pictures, Videos, Downloads, and your Desktop! You don’t want to miss anything.
If you need more detailed directions, Sandisk has guides for Windows XP, Vista, 7 and Mac OS
here.
If you’re still lost, contact your school’s tech support person, or find a tech savvy teacher who can help you out ^_~
Step 2: Copy your work computer files to your home computer
Now it’s time to copy all of your files to your home computer. The reason I copy the files to my personal computer instead of moving them, is so that I still have a backup saved on my USB drive. We all make mistakes and I like to know that if I accidentally delete something I need, I can get it back.
Note: all of the following images and directions are based on Windows 7 but the basic concepts are the same.
The first thing you need to do is plug in and open your USB drive. Chances are as soon as you plug the drive in, a window will pop up and let you open it. If that doesn’t happen, or you accidentally closed it, here’s what you do.
Click the Windows start orb, then click Computer. This will open a window that shows your computers drives.
Double click on your USB drive. It will most likely be towards the bottom of the window.
Now that the files in your USB drive are visible, drag them onto your desktop to copy them over. (You don’t necessarily have to use your desktop, but I find that to be a good place to work on sorting files, since it doesn’t require extra folders to be open.)
Step 3: Consider your folder organization system

At the heart of any computer filing system are folders. Just like the filing cabinet folders teacher use to sort out student files, unit documents, etc., computer folders are designed to sort and separate computer files. Folders on your computer have the added benefit of what’s called a folder tree or folder hierarchy. Simply, you can have sub-folders inside of folders. This allows you to create folders for larger categories, and then more specific folders within those.
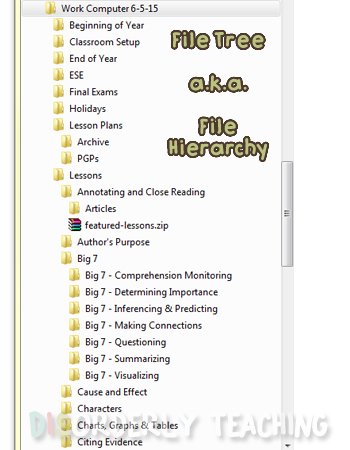
As you can see in this image, I have a folder called Lesson Plans. Inside that folder is a folder titled Archive (for old plans), and one called PGP (for Professional Growth Plans).
Below that is a more complex set up, with a Lessons folder, which is full of folders for each subject I teach. Inside many of those folders are sub folders to break things down even more specifically.
Now that you understand how the folder system works, it’s time to decide HOW you want your folders organized. As you can see in my folder tree, I have main folders based on key times of the year (beginning, end, and holidays), a separate folder (Classroom Setup) for printables for around my room, a folder for all of my ESE work, one for final exams, and the aforementioned Lessons folder.
The list goes on and on.
If you click here you can see my entire folder tree. This was pre-reorganizing so it may change a bit, but you can see how much I love using folders! By contrast, my co-teacher uses much fewer sub-folders because she doesn’t like have to click into multiple folders to find something. I can’t stand scrolling through long lists of files, so her system doesn’t work for me. You really just need to find what’s right for you.
That being said, I do have some recommendations.
On my computer, the Lessons folder is the heart of my teaching. I know that all of my teaching materials are in that folder and its subfolders; nowhere else. Nothing but actual teaching materials go in here.
I’d recommend a Personal folder. No, we’re not supposed to handle personal business at work, but we’ve all had to fax a letter to a doctor, submit insurance information online, or something else that we find takes up our lunch break ; ) So have a spot to keep anything that has to do with your personal life to keep it separate.
Create a To Sort folder. I use this as a safety net for when I get overwhelmed with fifteen million things and I stop keeping up with organizing my files. At the end of this school year I had 165 files sitting in that folder to sort through! Can you imagine if they were scattered throughout my computer instead?
I also have a folder called School Documents. This is where I save the various passes, schedules, testing calendars, etc. that administration sends out. I like keeping them separate because 1) it makes it easy to find them, and 2) I can usually delete them at the end of the year since admin sends out updated documents each August.
Everything else is really up to you. You know what you have and need, so you can best organize.
Step 4: Create folders for your newly organized files
Here’s the key step. We’re going to create ALL new folders to move your files into. First create a master folder to put all of your files in. This will keep everything in one place and make transferring it back to your work computer easier.
To create a new folder, right click on the Desktop. Put your mouse over New to open another menu, then click on Folder. Your New folder will appear with the text highlighted in blue so you can change the folder’s name. I named mine Work Computer – Organized but you can name it whatever you want.
If you’re super organized and know exactly where your files will end up, you can create all of your folders at once. Since I tend to mix things up a bit and organize things a little differently each year, I like to create folders as I go along. I start by creating some of my master folders, then add others as I need them.
DO NOT just copy over full folders from your existing files! The idea is to actually look at everything as you go.
Step 5: Move your files and delete the junk
Ah, the final step. Time to move your files over. As I said in Step 4, the idea here is for you to actually LOOK at your files. I’m willing to bet there are some you haven’t opened up in years. Do you really need those sitting around taking up room and gumming up the works? If you haven’t used something in years, and aren’t suddenly inspired now that you’re looking at it, go ahead and delete it. Anything you want to keep, move it into the appropriate folder.
What will happen is that gradually you’ll be emptying out your old archive folder, and filling up the new folder. By doing it this way you ensure that you went through every single file and you’ll know you’re truly done when the older folder is empty.
So there it is: 5 Steps to Organize Your Teacher Computer Files. Hopefully I’ve explained everything clearly enough. If you have any questions or suggestions, please let me know in the comments below and I do another post to add anything I missed, clarify, or throw out some advanced tips.
I’d love to know how this system works out for you, and feel free to tell me how you organize your files. I'm always looking for new ideas!


